环境准备
准备 4 台 Ubuntu16.04 虚拟机,3 台用来存储,1 台用来监控。
组件分配如下:
| 节点类型 | 部署数量 | 所在节点 IP |
|---|---|---|
| TiKV | 3 | 192.168.52.150 192.168.52.151 192.168.52.152 |
| PD | 3 | 192.168.52.150 192.168.52.151 192.168.52.152 |
| monitoring server | 1 | 192.168.52.153 |
| grafana server | 1 | 192.168.52.153 |
| alertmanager server | 1 | 192.168.52.153 |
部署预准备
连接与权限
该步将给每一个机器(节点)添加一个用户名为 tikv,并让各节点的 tikv 用户可以免认证进行 ssh 连接。每个节点都要添加该用户,因此预准备步骤所有机器都要执行。
编辑 /etc/ssh/sshd_config,以下字段设为 yes
PermitRootLogin yes
PasswordAuthentication yes
重启 sshd 服务
sudo service sshd restart添加用户 tikv
sudo adduser tikv执行 visudo 命令在末尾加上以下文本,让 tikv 可以免密使用 sudo 所有权限
tikv ALL=(ALL) NOPASSWD: ALL保存退出(按 Crtl + O,然后 Enter,最后 Ctrl + X)
配置 ssh 免认证登录(每个节点都要配置所有 IP,包括自己):
ssh-keygen -t rsa
ssh-copy-id -i ~/.ssh/id_rsa.pub 192.168.52.150
ssh-copy-id -i ~/.ssh/id_rsa.pub 192.168.52.151
ssh-copy-id -i ~/.ssh/id_rsa.pub 192.168.52.152
ssh-copy-id -i ~/.ssh/id_rsa.pub 192.168.52.153
认证是否能免认证登录其它节点:
ssh 其他节点IP
盘挂载(可选)
如果想让某一个节点使用特定的存储设备,比如 ssd,那么就在该机器上使用卷挂载,如果不用就直接跳过。比如,想在一个 tikv 节点上使用 SSD(/dev/sda1),那么就在该节点上执行以下挂载命令:
sudo fdisk -l
sudo fdisk /dev/sda1
sudo mkfs.ext4 /dev/sda1
sudo mount -t ext4 /dev/sda1 /data
sudo chmod -R 0777 /data
在之后的部署流程中,让该节点的数据存在 /data 下即可。
开始部署
部署操作只需要在 1 个节点上操作,这里我选择 192.168.52.150。部署步骤参考官方文档:TiUP 部署
安装
安装 TiUP:
curl --proto '=https' --tlsv1.2 -sSf https://tiup-mirrors.pingcap.com/install.sh | sh刷新环境变量:
source .bashrc验证 TiUP 是否安装成功:
tiup安装 TiUP cluster 组件:
tiup cluster更新 TiUP cluster 至最新版本:
tiup update --self && tiup update cluster验证 TiUP cluster 版本:
tiup --binary cluster配置
生成初始化的集群配置文件:
tiup cluster template > topology.yaml用以下内容替换 topology.yaml:
global:
  user: "tikv"
  ssh_port: 22
  deploy_dir: "/data/tikv-deploy"
  data_dir: "/data/tikv-data"
  arch: "amd64"
monitored:
  node_exporter_port: 9100
  blackbox_exporter_port: 9115

pd_servers:
  - host: 192.168.52.150
  - host: 192.168.52.151
  - host: 192.168.52.152

tikv_servers:
  - host: 192.168.52.150
  - host: 192.168.52.151
  - host: 192.168.52.152

monitoring_servers:
  - host: 192.168.52.153

grafana_servers:
  - host: 192.168.52.153

alertmanager_servers:
  - host: 192.168.52.153
开始部署
部署集群:
tiup cluster deploy tikv-test v5.0.1 ./topology.yaml --user root [-p] [-i /home/root/.ssh/gcp_rsa]You can use secret keys or interactive passwords for security authentication when you deploy TiKV using TiUP:
- If you use secret keys, you can specify the path of the keys through
-ior--identity_file;- If you use passwords, add the
-pflag to enter the password interaction window;- If password-free login to the target machine has been configured, no authentication is required.
这里我们选择之前生成的密钥文件,因此部署命令为:
tiup cluster deploy tikv-test v5.0.1 ./topology.yaml --user tikv -i ~/.ssh/id_rsa启动集群:
tiup cluster start foobarTiUP cluster 支持多集群管理,刚刚我们部署的只是一个集群,名为 tikv-test。想要查看所有集群,通过下述命令:
tiup cluster list查看指定集群的信息:
tiup cluster display tikv-test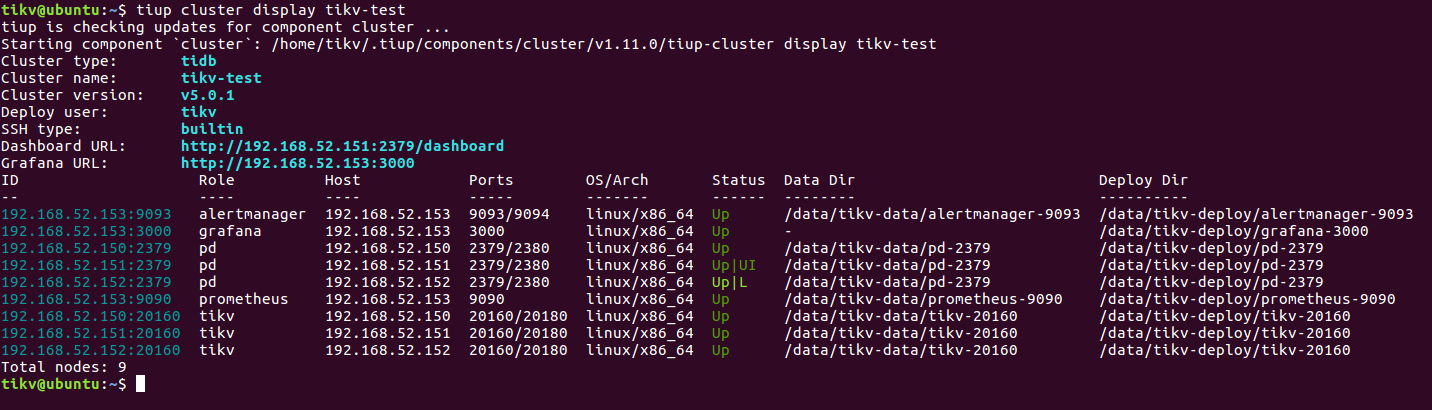
节点 4 部署了 grafana,用来监控集群,通过浏览器可以进入 dashboard:
URL: http://192.168.52.153:3000/
User: admin
Passwd: admin
安装 cli 工具进行 TiKV 管理,这里安装 v5.0.1 版本的,和集群版本同步:
tiup ctl:v5.0.1测试
使用 TiKV 的 go client 测试:https://tikv.org/docs/4.0/reference/clients/go/
使用 TiKV 的 python client 测试:https://tikv.org/docs/5.1/concepts/tikv-in-5-minutes/#set-up-a-local-tikv-cluster-with-the-default-options