本篇将记录采用kubeadm快速搭建单master的k8s集群的全过程,用于对k8s的学习。为了根据最新的集群特性,我们这里安装目前最新的版本 v1.16.2,如果在生产环境使用,建议使用上一个版本中最大的修正版本,比如 v1.15.5,由于 v1.16 版本和之前的版本有很大变化,主要体现在 APIVersion 移除了之前的一些版本,所以我们这里采用最新的 v1.16.2 的版本
环境准备
该阶段要在所有节点中都做一遍。
3个节点,都是 Centos 7.6 系统,内核版本:3.10.0-957.12.2.el7.x86_64,在每个节点上添加 hosts 信息:
$ cat /etc/hosts
192.168.186.147 master
192.168.186.148 node1
192.168.186.149 node2
节点的 hostname 必须使用标准的 DNS 命名,另外千万不用什么默认的 localhost 的 hostname,会导致各种错误出现的。在 Kubernetes 项目里,机器的名字以及一切存储在 Etcd 中的 API 对象,都必须使用标准的 DNS 命名(RFC 1123)。可以使用命令 hostnamectl set-hostname ydzs-node1 来修改 hostname。
禁用防火墙:
$ systemctl stop firewalld
$ systemctl disable firewalld
禁用SELINUX:
$ setenforce 0
$ cat /etc/selinux/config
SELINUX=disabled
由于开启内核 ipv4 转发需要加载 br_netfilter 模块,所以加载下该模块:
$ modprobe br_netfilter创建文件/etc/sysctl.d/k8s.conf,添加如下内容:
net.bridge.bridge-nf-call-ip6tables = 1
net.bridge.bridge-nf-call-iptables = 1
net.ipv4.ip_forward = 1
bridge-nf 使得 netfilter 可以对 Linux 网桥上的 IPv4/ARP/IPv6 包过滤。比如,设置
net.bridge.bridge-nf-call-iptables=1后,二层的网桥在转发包时也会被 iptables的 FORWARD 规则所过滤。常用的选项包括: > net.bridge.bridge-nf-call-arptables:是否在 arptables 的 FORWARD 中过滤网桥的 ARP 包
> net.bridge.bridge-nf-call-ip6tables:是否在 ip6tables 链中过滤 IPv6 包
> net.bridge.bridge-nf-call-iptables:是否在 iptables 链中过滤 IPv4 包
> net.bridge.bridge-nf-filter-vlan-tagged:是否在 iptables/arptables 中过滤打了 vlan 标签的包。
执行如下命令使修改生效:
$ sysctl -p /etc/sysctl.d/k8s.conf安装 ipvs:
$ cat > /etc/sysconfig/modules/ipvs.modules <<EOF
#!/bin/bash
modprobe -- ip_vs
modprobe -- ip_vs_rr
modprobe -- ip_vs_wrr
modprobe -- ip_vs_sh
modprobe -- nf_conntrack_ipv4
EOF
$ chmod 755 /etc/sysconfig/modules/ipvs.modules && bash /etc/sysconfig/modules/ipvs.modules && lsmod | grep -e ip_vs -e nf_conntrack_ipv4上面脚本创建了的/etc/sysconfig/modules/ipvs.modules文件,保证在节点重启后能自动加载所需模块。使用lsmod | grep -e ip_vs -e nf_conntrack_ipv4命令查看是否已经正确加载所需的内核模块。
接下来还需要确保各个节点上已经安装了 ipset 软件包:
$ yum install ipset为了便于查看 ipvs 的代理规则,最好安装一下管理工具 ipvsadm:
$ yum install ipvsadm同步服务器时间:
$ yum install chrony -y
$ systemctl enable chronyd
$ systemctl start chronyd
$ chronyc sources
210 Number of sources = 4
MS Name/IP address         Stratum Poll Reach LastRx Last sample
===============================================================================
^+ sv1.ggsrv.de                  2   6    17    32   -823us[-1128us] +/-   98ms
^- montreal.ca.logiplex.net      2   6    17    32    -17ms[  -17ms] +/-  179ms
^- ntp6.flashdance.cx            2   6    17    32    -32ms[  -32ms] +/-  161ms
^* 119.28.183.184                2   6    33    32   +661us[ +357us] +/-   38ms
$ date
Tue Aug 27 09:28:41 CST 2019
关闭 swap 分区:
$ swapoff -a修改/etc/fstab文件,注释掉 SWAP 的自动挂载,使用free -m确认 swap 已经关闭。swappiness 参数调整,修改/etc/sysctl.d/k8s.conf添加下面一行:
vm.swappiness=0执行sysctl -p /etc/sysctl.d/k8s.conf使修改生效。
接下来可以安装 Docker:
$ yum install -y yum-utils \
  device-mapper-persistent-data \
  lvm2
# 如果下面命令执行超时,可以使用阿里云的源代替:http://mirrors.aliyun.com/docker-ce/linux/centos/docker-ce.repo
$ yum-config-manager \
    --add-repo \
    https://download.docker.com/linux/centos/docker-ce.repo
$ yum list docker-ce --showduplicates | sort -r
 * updates: mirrors.tuna.tsinghua.edu.cn
Loading mirror speeds from cached hostfile
Loaded plugins: fastestmirror, langpacks
Installed Packages
 * extras: mirrors.tuna.tsinghua.edu.cn
 * epel: mirrors.yun-idc.com
docker-ce.x86_64            3:19.03.1-3.el7                     docker-ce-stable
docker-ce.x86_64            3:19.03.0-3.el7                     docker-ce-stable
docker-ce.x86_64            3:18.09.8-3.el7                     docker-ce-stable
......
docker-ce.x86_64            18.03.1.ce-1.el7.centos             docker-ce-stable
docker-ce.x86_64            18.03.0.ce-1.el7.centos             docker-ce-stable
......
 * base: mirror.lzu.edu.cn
Available Packages可以选择安装一个版本,比如这里使用18.09.9版本:
$ yum install docker-ce-18.09.9配置 Docker 镜像加速器,这一步在阿里云的容器镜像服务 –> 镜像加速器中有具体代码,每个人的不一样:
sudo mkdir -p /etc/docker
sudo tee /etc/docker/daemon.json <<-'EOF'
{
  "exec-opts": ["native.cgroupdriver=systemd"], # 额外加的
  "registry-mirrors": ["https://xxxxxxx.mirror.aliyuncs.com"]
}
EOF
sudo systemctl daemon-reload
sudo systemctl restart docker
注意,这里有个坑。由于默认情况下 kubelet 使用的 cgroupdriver 是 systemd,而docker默认使用的cgroupdriver是cgroupfs,不一样。这里需要保持二者的cgroupdriver一致,为了避免更改kublet的cgroupdriver,我们将docker的cgroupdriver更改为systemd。这就是为什么上述代码要额外加一行。
Docker设置开机自启:
$ systemctl enable docker # 开机自启在确保 Docker 安装完成后,上面的相关环境配置也完成了,现在我们就可以来安装 Kubeadm 了,我们这里是通过指定yum 源的方式来进行安装的:
cat <<EOF > /etc/yum.repos.d/kubernetes.repo
[kubernetes]
name=Kubernetes
baseurl=https://packages.cloud.google.com/yum/repos/kubernetes-el7-x86_64
enabled=1
gpgcheck=1
repo_gpgcheck=1
gpgkey=https://packages.cloud.google.com/yum/doc/yum-key.gpg
        https://packages.cloud.google.com/yum/doc/rpm-package-key.gpg
EOF
当然了,上面的 yum 源是需要科学上网的,如果不能科学上网的话,我们可以使用阿里云的源进行安装:
cat <<EOF > /etc/yum.repos.d/kubernetes.repo
[kubernetes]
name=Kubernetes
baseurl=http://mirrors.aliyun.com/kubernetes/yum/repos/kubernetes-el7-x86_64
enabled=1
gpgcheck=0
repo_gpgcheck=0
gpgkey=http://mirrors.aliyun.com/kubernetes/yum/doc/yum-key.gpg
        http://mirrors.aliyun.com/kubernetes/yum/doc/rpm-package-key.gpg
EOF
然后安装 kubeadm、kubelet、kubectl:
# --disableexcludes 禁掉除了kubernetes之外的别的仓库
$ yum install -y kubelet-1.16.2 kubeadm-1.16.2 kubectl-1.16.2 --disableexcludes=kubernetes
$ kubeadm version
kubeadm version: &version.Info{Major:"1", Minor:"16", GitVersion:"v1.16.2", GitCommit:"c97fe5036ef3df2967d086711e6c0c405941e14b", GitTreeState:"clean", BuildDate:"2019-10-15T19:15:39Z", GoVersion:"go1.12.10", Compiler:"gc", Platform:"linux/amd64"}
可以看到我们这里安装的是 v1.16.2 版本,然后将 kubelet 设置成开机启动:
$ systemctl enable --now kubelet到目前为止,上述全部操作在所有节点都要进行。
初始化master
该节点只需master节点做,从节点要跳过。首先,在master 节点配置 kubeadm 初始化文件,可以通过如下命令导出默认的初始化配置:
$ kubeadm config print init-defaults > kubeadm.yaml然后根据我们自己的需求修改配置,比如修改 imageRepository 的值,kube-proxy 的模式为 ipvs,另外需要注意的是我们这里是准备安装 flannel 网络插件的,需要将 networking.podSubnet 设置为10.244.0.0/16:
apiVersion: kubeadm.k8s.io/v1beta2
bootstrapTokens:
- groups:
  - system:bootstrappers:kubeadm:default-node-token
  token: abcdef.0123456789abcdef
  ttl: 24h0m0s
  usages:
  - signing
  - authentication
kind: InitConfiguration
localAPIEndpoint:
  advertiseAddress: 192.168.186.147  # apiserver 节点内网IP
  bindPort: 6443
nodeRegistration:
  criSocket: /var/run/dockershim.sock
  name: master  # 默认读取当前节点的hostname
  taints:
  - effect: NoSchedule
    key: node-role.kubernetes.io/master
---
apiServer:
  timeoutForControlPlane: 4m0s
apiVersion: kubeadm.k8s.io/v1beta2
certificatesDir: /etc/kubernetes/pki
clusterName: kubernetes
controllerManager: {}
dns:
  type: CoreDNS
etcd:
  local:
    dataDir: /var/lib/etcd
imageRepository: registry.aliyuncs.com/google_containers  # 修改成阿里云镜像源
kind: ClusterConfiguration
kubernetesVersion: v1.16.2  # 版本一定要写对,不然会是坑
networking:
  dnsDomain: cluster.local
  podSubnet: 10.244.0.0/16  # Pod 网段,flannel插件需要使用这个网段
  serviceSubnet: 10.96.0.0/12
scheduler: {}
---
apiVersion: kubeproxy.config.k8s.io/v1alpha1
kind: KubeProxyConfiguration
mode: ipvs  # kube-proxy 模式
对于上面的资源清单的文档比较杂,要想完整了解上面的资源对象对应的属性,可以查看对应的 godoc 文档,地址:
https://godoc.org/k8s.io/kubernetes/cmd/kubeadm/app/apis/kubeadm/v1beta2
然后使用上面的配置文件进行初始化:
$ kubeadm init --config kubeadm.yaml
[init] Using Kubernetes version: v1.16.2
[preflight] Running pre-flight checks
	[WARNING SystemVerification]: this Docker version is not on the list of validated versions: 20.10.12. Latest validated version: 18.09
[preflight] Pulling images required for setting up a Kubernetes cluster
[preflight] This might take a minute or two, depending on the speed of your internet connection
[preflight] You can also perform this action in beforehand using 'kubeadm config images pull'
[kubelet-start] Writing kubelet environment file with flags to file "/var/lib/kubelet/kubeadm-flags.env"
[kubelet-start] Writing kubelet configuration to file "/var/lib/kubelet/config.yaml"
[kubelet-start] Activating the kubelet service
[certs] Using certificateDir folder "/etc/kubernetes/pki"
[certs] Generating "ca" certificate and key
[certs] Generating "apiserver" certificate and key
[certs] apiserver serving cert is signed for DNS names [master kubernetes kubernetes.default kubernetes.default.svc kubernetes.default.svc.cluster.local] and IPs [10.96.0.1 192.168.186.147]
[certs] Generating "apiserver-kubelet-client" certificate and key
[certs] Generating "front-proxy-ca" certificate and key
[certs] Generating "front-proxy-client" certificate and key
[certs] Generating "etcd/ca" certificate and key
[certs] Generating "etcd/server" certificate and key
[certs] etcd/server serving cert is signed for DNS names [master localhost] and IPs [192.168.186.147 127.0.0.1 ::1]
[certs] Generating "etcd/peer" certificate and key
[certs] etcd/peer serving cert is signed for DNS names [master localhost] and IPs [192.168.186.147 127.0.0.1 ::1]
[certs] Generating "etcd/healthcheck-client" certificate and key
[certs] Generating "apiserver-etcd-client" certificate and key
[certs] Generating "sa" key and public key
[kubeconfig] Using kubeconfig folder "/etc/kubernetes"
[kubeconfig] Writing "admin.conf" kubeconfig file
[kubeconfig] Writing "kubelet.conf" kubeconfig file
[kubeconfig] Writing "controller-manager.conf" kubeconfig file
[kubeconfig] Writing "scheduler.conf" kubeconfig file
[control-plane] Using manifest folder "/etc/kubernetes/manifests"
[control-plane] Creating static Pod manifest for "kube-apiserver"
[control-plane] Creating static Pod manifest for "kube-controller-manager"
[control-plane] Creating static Pod manifest for "kube-scheduler"
[etcd] Creating static Pod manifest for local etcd in "/etc/kubernetes/manifests"
[wait-control-plane] Waiting for the kubelet to boot up the control plane as static Pods from directory "/etc/kubernetes/manifests". This can take up to 4m0s
[apiclient] All control plane components are healthy after 14.001969 seconds
[upload-config] Storing the configuration used in ConfigMap "kubeadm-config" in the "kube-system" Namespace
[kubelet] Creating a ConfigMap "kubelet-config-1.16" in namespace kube-system with the configuration for the kubelets in the cluster
[upload-certs] Skipping phase. Please see --upload-certs
[mark-control-plane] Marking the node master as control-plane by adding the label "node-role.kubernetes.io/master=''"
[mark-control-plane] Marking the node master as control-plane by adding the taints [node-role.kubernetes.io/master:NoSchedule]
[bootstrap-token] Using token: abcdef.0123456789abcdef
[bootstrap-token] Configuring bootstrap tokens, cluster-info ConfigMap, RBAC Roles
[bootstrap-token] configured RBAC rules to allow Node Bootstrap tokens to post CSRs in order for nodes to get long term certificate credentials
[bootstrap-token] configured RBAC rules to allow the csrapprover controller automatically approve CSRs from a Node Bootstrap Token
[bootstrap-token] configured RBAC rules to allow certificate rotation for all node client certificates in the cluster
[bootstrap-token] Creating the "cluster-info" ConfigMap in the "kube-public" namespace
[addons] Applied essential addon: CoreDNS
[addons] Applied essential addon: kube-proxy

Your Kubernetes control-plane has initialized successfully!

To start using your cluster, you need to run the following as a regular user:

  mkdir -p $HOME/.kube
  sudo cp -i /etc/kubernetes/admin.conf $HOME/.kube/config
  sudo chown $(id -u):$(id -g) $HOME/.kube/config

You should now deploy a pod network to the cluster.
Run "kubectl apply -f [podnetwork].yaml" with one of the options listed at:
  https://kubernetes.io/docs/concepts/cluster-administration/addons/

Then you can join any number of worker nodes by running the following on each as root:

kubeadm join 192.168.186.147:6443 --token abcdef.0123456789abcdef \
    --discovery-token-ca-cert-hash sha256:8db87a6d2a260bcb89b9df0e98072173578c34c160493c6915917143763a97e4
注意,如果之前没有更改过docker的cgroupdriver,这里会报一个Warning:
[WARNING IsDockerSystemdCheck]: detected "cgroupfs" as the Docker cgroup driver. The recommended driver is "systemd". Please follow the guide at https://kubernetes.io/docs/setup/cri/接着,按照提示,依次执行:
$ mkdir -p $HOME/.kube
$ sudo cp -i /etc/kubernetes/admin.conf $HOME/.kube/config
$ sudo chown $(id -u):$(id -g) $HOME/.kube/config注意,kubeadm init输出结果的最后一部分kubeadm join <flags>非常重要,如果从节点想要加入该master的集群,就需要敲入该命令。如果一不小心忘记了该命令,也没关系,可以使用下述命令重现:
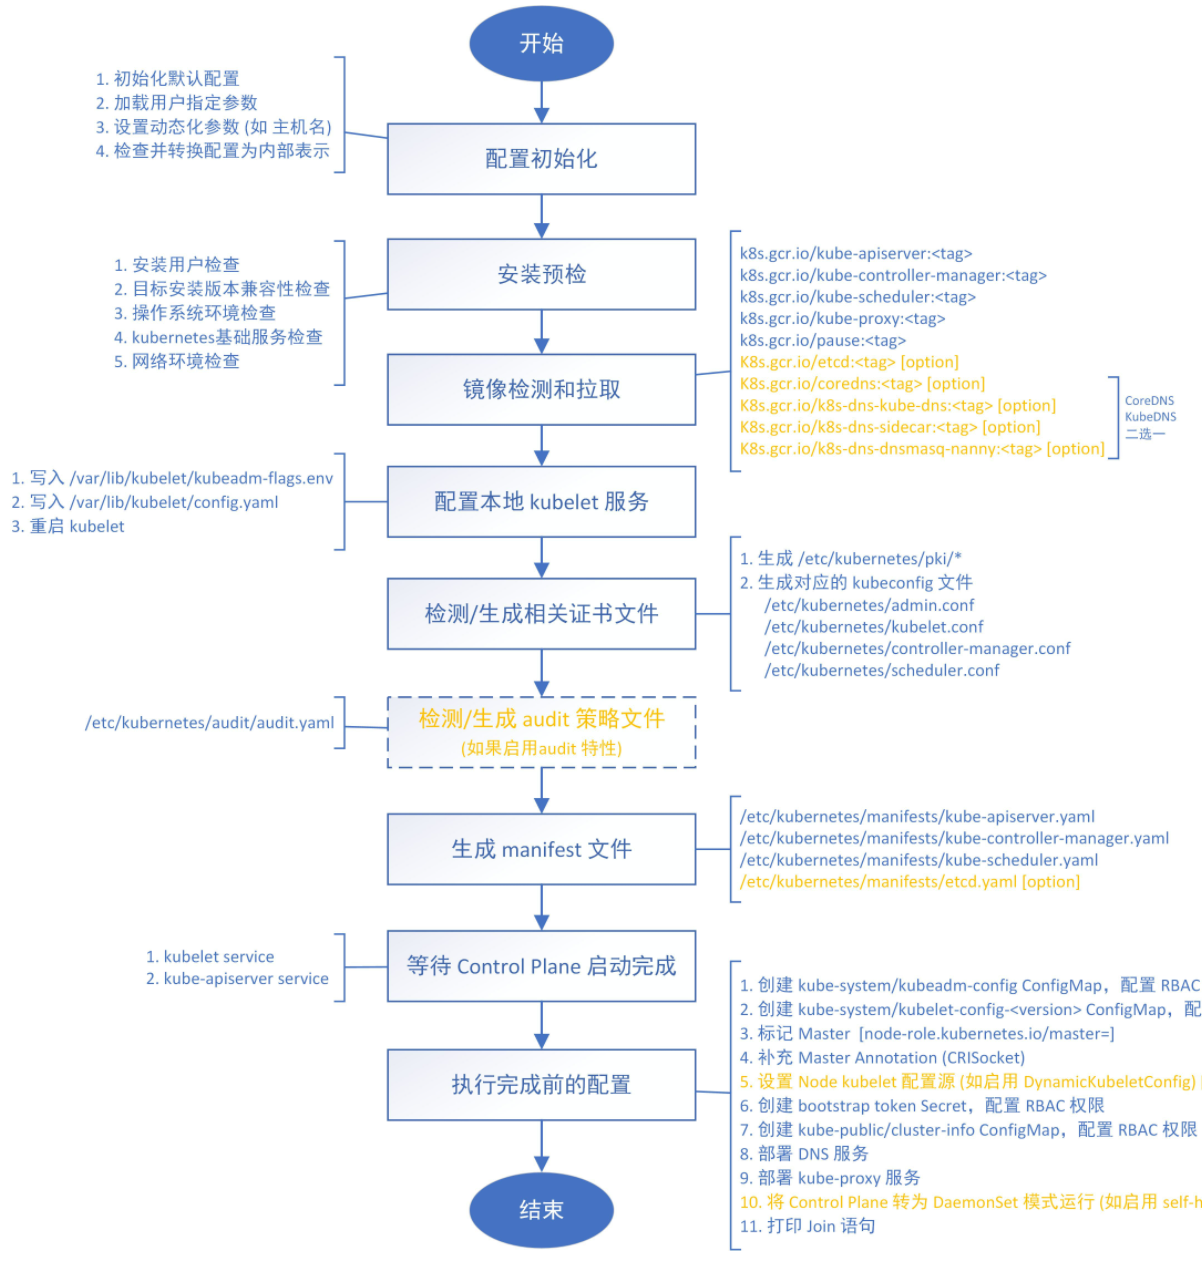
$ kubeadm token create --print-join-commandkubeadm init的执行流程如下:
添加节点
该阶段只需在从节点中进行。直接复制master节点给出的kubeadm join ...在终端执行:
[root@node2 sakura]# kubeadm join 192.168.186.147:6443 --token abcdef.0123456789abcdef \
>     --discovery-token-ca-cert-hash sha256:8db87a6d2a260bcb89b9df0e98072173578c34c160493c6915917143763a97e4
[preflight] Running pre-flight checks
	[WARNING SystemVerification]: this Docker version is not on the list of validated versions: 20.10.12. Latest validated version: 18.09
[preflight] Reading configuration from the cluster...
[preflight] FYI: You can look at this config file with 'kubectl -n kube-system get cm kubeadm-config -oyaml'
[kubelet-start] Downloading configuration for the kubelet from the "kubelet-config-1.16" ConfigMap in the kube-system namespace
[kubelet-start] Writing kubelet configuration to file "/var/lib/kubelet/config.yaml"
[kubelet-start] Writing kubelet environment file with flags to file "/var/lib/kubelet/kubeadm-flags.env"
[kubelet-start] Activating the kubelet service
[kubelet-start] Waiting for the kubelet to perform the TLS Bootstrap...

This node has joined the cluster:
* Certificate signing request was sent to apiserver and a response was received.
* The Kubelet was informed of the new secure connection details.

Run 'kubectl get nodes' on the control-plane to see this node join the cluster.
kubeadm join命令的执行流程:

出现上述结果就说明节点已经加入集群成功,使用kubectl get nodes就可以看到所在集群的全部节点信息,但此时执行该命令会报错:
[root@node2 k8s]# kubectl get nodes
Unable to connect to the server: x509: certificate signed by unknown authority (possibly because of "crypto/rsa: verification error" while trying to verify candidate authority certificate "kubernetes")我们需要将master节点中$HOME/.kube/config 的内容拷贝进当前节点的$HOME/.kube/config中,上述命令才得以执行成功:
[root@node2 k8s]# kubectl get nodes
NAME     STATUS     ROLES    AGE   VERSION
master   NotReady   master   30m   v1.16.2
node2    NotReady   <none>   28m   v1.16.2
用同样的方式加入其他从节点即可
网络插件
该阶段配置的整个集群的网络插件,所以在集群内的任何一个节点进行即可。
在上一步中可以看到,节点都是NotReady状态,这是因为还没有安装网络插件,在k8s官网中是这样描述网络插件的重要性的:
你必须部署一个基于 Pod 网络插件的 容器网络接口(CNI),以便你的 Pod 可以相互通信。 在安装网络之前,**集群 DNS (CoreDNS) **将不会启动。
接下来安装网络插件,可以在文档:k8s网络插件 中选择我们要用的网络插件,这里使用的是flannel:
$ wget https://raw.githubusercontent.com/coreos/flannel/2140ac876ef134e0ed5af15c65e414cf26827915/Documentation/kube-flannel.yml
# 因为有节点是多网卡,所以需要在资源清单文件中指定内网网卡
# 搜索到名为 kube-flannel-ds-amd64 的 DaemonSet,在kube-flannel容器下面
$ vi kube-flannel.yml
......
containers:
- name: kube-flannel
  image: quay.io/coreos/flannel:v0.11.0-amd64
  command:
  - /opt/bin/flanneld
  args:
  - --ip-masq
  - --kube-subnet-mgr
  - --iface=ens33  # 如果是多网卡的话,指定内网网卡的名称
......
$ kubectl apply -f kube-flannel.yml  # 安装 flannel 网络插件
隔一会儿查看 Pod 运行状态:
[root@node2 k8s]# kubectl get pods -n kube-system
NAME                             READY   STATUS    RESTARTS   AGE
coredns-58cc8c89f4-9qb66         1/1     Running   0          75m
coredns-58cc8c89f4-zmdk7         1/1     Running   0          75m
etcd-master                      1/1     Running   0          74m
kube-apiserver-master            1/1     Running   0          74m
kube-controller-manager-master   1/1     Running   0          74m
kube-flannel-ds-amd64-654x9      1/1     Running   0          72s
kube-flannel-ds-amd64-p6dsg      1/1     Running   0          72s
kube-proxy-26225                 1/1     Running   0          75m
kube-proxy-vwtbd                 1/1     Running   0          73m
kube-scheduler-master            1/1     Running   0          74m
当我们部署完网络插件后执行 ifconfig 命令,正常会看到新增的cni0与flannel1这两个虚拟设备,但是如果没有看到cni0这个设备也不用太担心,我们可以观察/var/lib/cni目录是否存在,如果不存在并不是说部署有问题,而是该节点上暂时还没有应用运行,我们只需要在该节点上运行一个 Pod 就可以看到该目录会被创建,并且cni0设备也会被创建出来。
网络插件运行成功了,node 状态也正常了:
[root@node2 k8s]# kubectl get nodes
NAME     STATUS   ROLES    AGE   VERSION
master   Ready    master   76m   v1.16.2
node2    Ready    <none>   74m   v1.16.2
至于为什么说这个配置在一个节点运行,可以看下flannel的yaml文件中有这么一行:
...
apiVersion: apps/v1
kind: DaemonSet
...DeaomSet也是一个k8s对象,它保证在每个Node上都运行一个容器副本,常用来部署一些集群的日志、监控或者其他系统管理应用。典型的应用包括:
- 日志收集,比如fluentd,logstash等
- 系统监控,比如Prometheus Node Exporter,collectd,New Relic agent,Ganglia gmond等
- 系统程序,比如kube-proxy, kube-dns, glusterd, ceph等
Dashboard
Dashboard 是基于网页的 Kubernetes 管理界面,你可以使用 Dashboard 获取运行在集群中的应用的概览信息,也可以创建或者修改 Kubernetes 资源 (如 Deployment,Job,DaemonSet 等等)。例如,你可以对 Deployment 实现弹性伸缩、发起滚动升级、重启 Pod 或者使用向导创建新的应用等。在集群中的任何一个节点运行即可。
v1.16.2 版本的集群需要安装最新的 2.0+ 版本的 Dashboard,首先下载下来:
$ wget https://raw.githubusercontent.com/kubernetes/dashboard/v2.0.0-beta5/aio/deploy/recommended.yamlDashboard的默认Service是ClusterIP类型(只有集群内部能访问),这里要改为NodePort类型,使集群外部可以访问。修改recommended.yaml中的Service部分,加一行代码:
$ vim recommended.yaml
# 修改Service为NodePort类型
......
kind: Service
apiVersion: v1
metadata:
  labels:
    k8s-app: kubernetes-dashboard
  name: kubernetes-dashboard
  namespace: kubernetes-dashboard
spec:
  ports:
    - port: 443
      targetPort: 8443
  selector:
    k8s-app: kubernetes-dashboard
  type: NodePort  # 加上type=NodePort变成NodePort类型的服务
......
直接应用:
$ kubectl apply -f recommended.yamlDashboard会默认安装在kubernetes-dashboard这个命名空间下,查看全部服务状态:
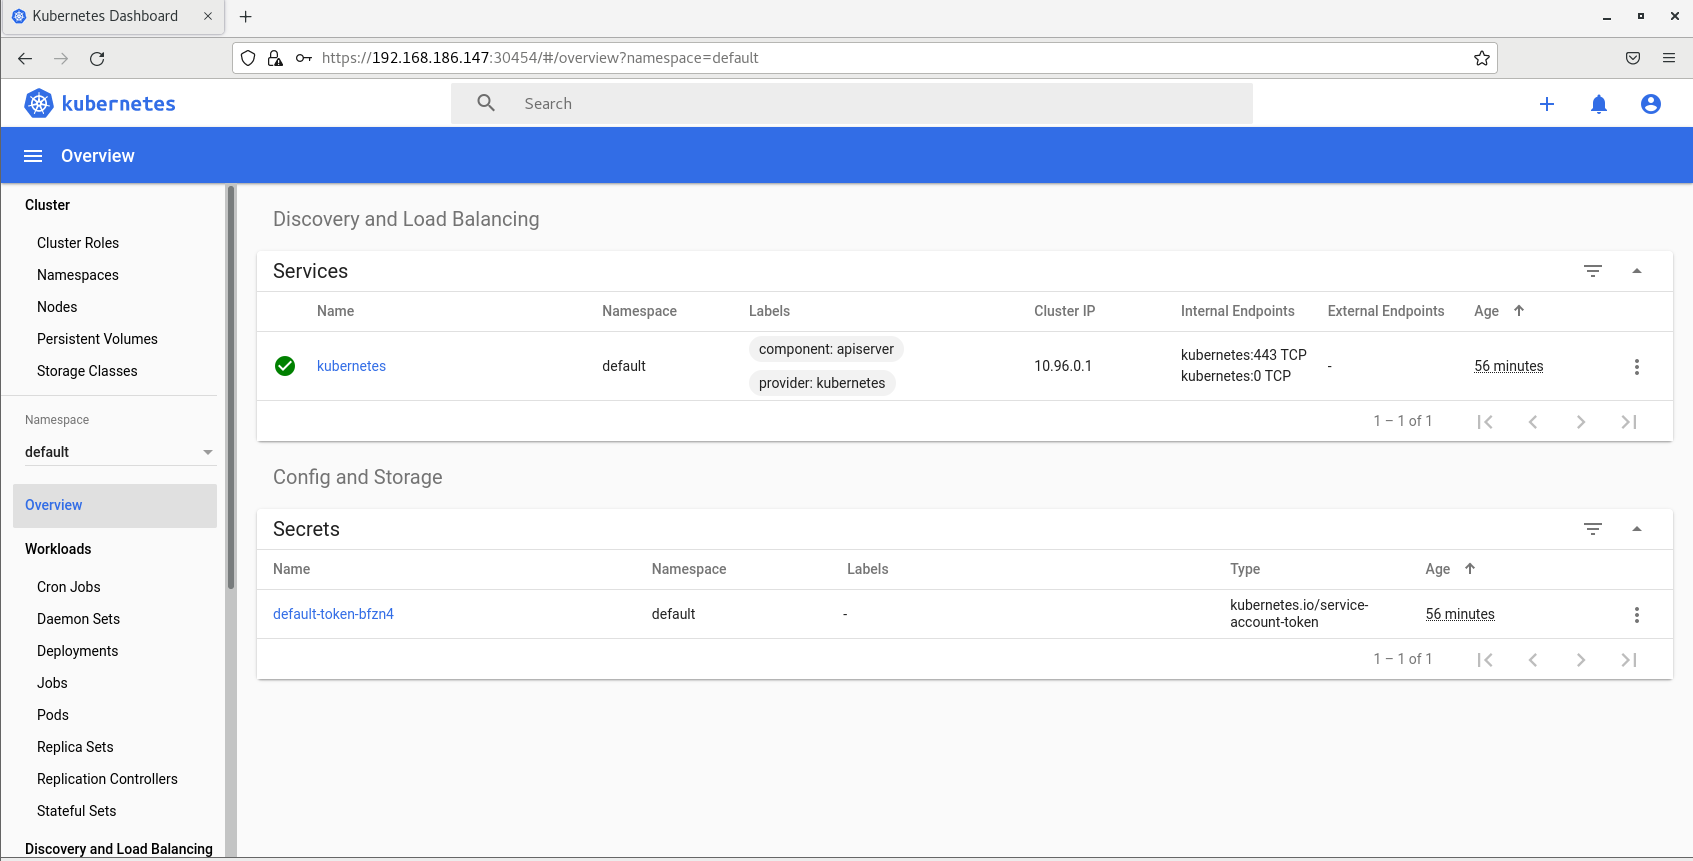
$ kubectl get all -n kubernetes-dashboard
NAME                                             READY   STATUS    RESTARTS   AGE
pod/dashboard-metrics-scraper-76585494d8-hznl6   1/1     Running   0          8m21s
pod/kubernetes-dashboard-6b86b44f87-slgtm        1/1     Running   0          8m21s

NAME                                TYPE        CLUSTER-IP      EXTERNAL-IP   PORT(S)         AGE
service/dashboard-metrics-scraper   ClusterIP   10.105.26.186   <none>        8000/TCP        8m21s
service/kubernetes-dashboard        NodePort    10.102.177.14   <none>        443:30454/TCP   8m21s

NAME                                        READY   UP-TO-DATE   AVAILABLE   AGE
deployment.apps/dashboard-metrics-scraper   1/1     1            1           8m21s
deployment.apps/kubernetes-dashboard        1/1     1            1           8m21s

NAME                                                   DESIRED   CURRENT   READY   AGE
replicaset.apps/dashboard-metrics-scraper-76585494d8   1         1         1       8m21s
replicaset.apps/kubernetes-dashboard-6b86b44f87 1 1 1 8m21s在service部分可以看到,dashboard映射到30454端口。使用任意一个节点的IP:30454即可进入dashborad,注意要用https,不能用http。这里用主节点IP:
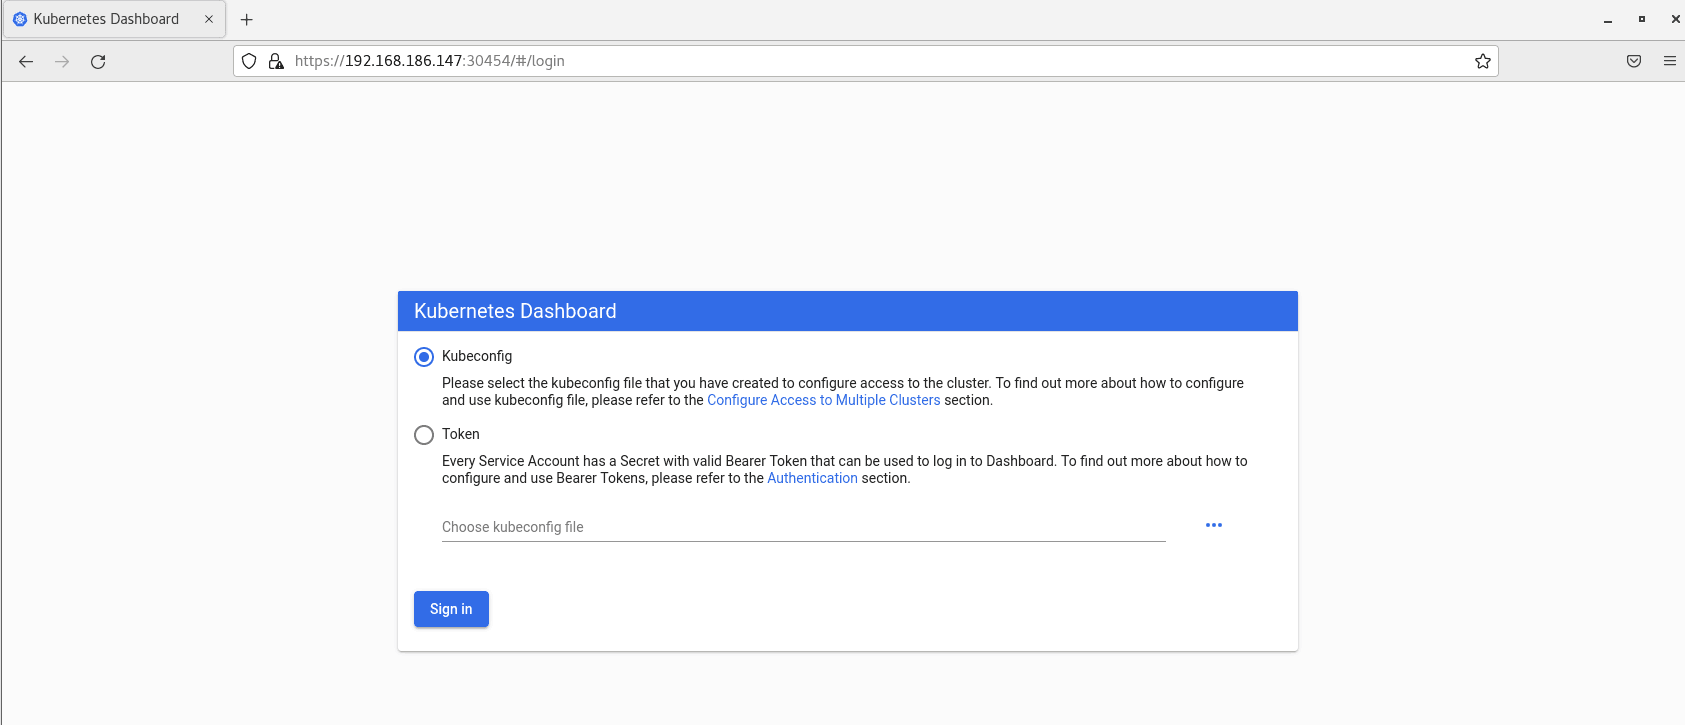
选择Token来进入,但是现在没有Token,因此需要先创建一个用户。这里创建一个具有全局所有权限的用户来登录dashboard。新建文件admin.yml,写入下述内容:
kind: ClusterRoleBinding
apiVersion: rbac.authorization.k8s.io/v1beta1
metadata:
  name: admin
  annotations:
    rbac.authorization.kubernetes.io/autoupdate: "true"
roleRef:
  kind: ClusterRole
  name: cluster-admin
  apiGroup: rbac.authorization.k8s.io
subjects:
- kind: ServiceAccount
  name: admin
  namespace: kubernetes-dashboard

---
apiVersion: v1
kind: ServiceAccount
metadata:
  name: admin
  namespace: kubernetes-dashboard
然后值即apply上述yaml文件,创建用户admin:
$ kubectl apply -f admin.yaml
clusterrolebinding.rbac.authorization.k8s.io/admin created
serviceaccount/admin created
接着,获取该用户的Token,是一个很长的base64解码后的字符串:
$ kubectl get secret -n kubernetes-dashboard|grep admin-token
admin-token-ctmrh                  kubernetes.io/service-account-token   3      26s
$ kubectl get secret admin-token-ctmrh -o jsonpath={.data.token} -n kubernetes-dashboard |base64 -d  #会生成一个很长的字符串,即Token
copy下上述Token就行了:
至此,我们完成了使用 kubeadm 搭建 v1.16.2 版本的 kubernetes 集群、coredns、ipvs、flannel、dashboard。
清空
如果你的集群安装过程中遇到了其他问题,我们可以使用下面的命令来进行重置:
$ kubeadm reset
$ ifconfig cni0 down && ip link delete cni0
$ ifconfig flannel.1 down && ip link delete flannel.1
$ rm -rf /var/lib/cni/
注意,第2、3步非常重要,要删除cni0和flannel.1虚拟网卡。以cni0为例,之前说过,新加入的节点会在刚建立第一个Pod时建立一个cni0网卡,并在Pod网段中给它分配IP。
如果之前的cni0没有删除,很不幸,这个node并不会覆盖之前的cni0或者直接使用它,而是会一直尝试用新的ip创建一个cni0并会一直失败,导致这个node上的Pod根本无法建立,describe可以看到Pod创建错误如下: