一个Pod完整的生命周期主要包含三个核心部分:Init Container、Pod Hook、健康检查。这里将分别介绍这三个核心部分。不过在开始之前,需要先了解下Pod的状态,因为Pod状态可以反应出当前Pod的具体信息,也是分析排错的一个必备方式。
Pod状态
首先了解下Pod的状态值,可以通过kubectl explain pod.status命令来查看状态的介绍。Pod的状态定义在PodStatus结构中,其源码如下:
// PodStatus represents information about the status of a pod. Status may trail the actual
// state of a system.
type PodStatus struct {
	// Current condition of the pod.
	// More info: https://kubernetes.io/docs/concepts/workloads/pods/pod-lifecycle#pod-phase
	// +optional
	Phase PodPhase `json:"phase,omitempty" protobuf:"bytes,1,opt,name=phase,casttype=PodPhase"`
	// Current service state of pod.
	// More info: https://kubernetes.io/docs/concepts/workloads/pods/pod-lifecycle#pod-conditions
	// +optional
	// +patchMergeKey=type
	// +patchStrategy=merge
	Conditions []PodCondition `json:"conditions,omitempty" patchStrategy:"merge" patchMergeKey:"type" protobuf:"bytes,2,rep,name=conditions"`
	// A human readable message indicating details about why the pod is in this condition.
	// +optional
	Message string `json:"message,omitempty" protobuf:"bytes,3,opt,name=message"`
	// A brief CamelCase message indicating details about why the pod is in this state.
	// e.g. 'Evicted'
	// +optional
	Reason string `json:"reason,omitempty" protobuf:"bytes,4,opt,name=reason"`

	// IP address of the host to which the pod is assigned. Empty if not yet scheduled.
	// +optional
	HostIP string `json:"hostIP,omitempty" protobuf:"bytes,5,opt,name=hostIP"`
	// IP address allocated to the pod. Routable at least within the cluster.
	// Empty if not yet allocated.
	// +optional
	PodIP string `json:"podIP,omitempty" protobuf:"bytes,6,opt,name=podIP"`

	// RFC 3339 date and time at which the object was acknowledged by the Kubelet.
	// This is before the Kubelet pulled the container image(s) for the pod.
	// +optional
	StartTime *metav1.Time `json:"startTime,omitempty" protobuf:"bytes,7,opt,name=startTime"`

	// The list has one entry per init container in the manifest. The most recent successful
	// init container will have ready = true, the most recently started container will have
	// startTime set.
	// More info: https://kubernetes.io/docs/concepts/workloads/pods/pod-lifecycle#pod-and-container-status
	InitContainerStatuses []ContainerStatus `json:"initContainerStatuses,omitempty" protobuf:"bytes,10,rep,name=initContainerStatuses"`

	// The list has one entry per container in the manifest. Each entry is currently the output
	// of `docker inspect`.
	// More info: https://kubernetes.io/docs/concepts/workloads/pods/pod-lifecycle#pod-and-container-status
	// +optional
	ContainerStatuses []ContainerStatus `json:"containerStatuses,omitempty" protobuf:"bytes,8,rep,name=containerStatuses"`
	// The Quality of Service (QOS) classification assigned to the pod based on resource requirements
	// See PodQOSClass type for available QOS classes
	// More info: https://github.com/kubernetes/kubernetes/blob/master/docs/design/resource-qos.md
	// +optional
	QOSClass PodQOSClass `json:"qosClass,omitempty" protobuf:"bytes,9,rep,name=qosClass"`
}其中,每个字段的注释都和explain命令中显示的介绍一模一样。这里介绍两个字段,首先是phase字段,其类型为Podphase,实际就是个string。
// PodPhase is a label for the condition of a pod at the current time.
type PodPhase string
// These are the valid statuses of pods.
const (
	PodPending PodPhase = "Pending"
	PodRunning PodPhase = "Running"
	PodSucceeded PodPhase = "Succeeded"
	PodFailed PodPhase = "Failed"
	PodUnknown PodPhase = "Unknown"
)phase的可能取值共有5个,分别代表5个大的状态:
- 挂起(Pending):Pod 信息已经提交给了集群,但是还没有被调度器调度到合适的节点或者已调度但是 Pod 里的镜像正在下载;
- 运行中(Running):该 Pod 已经绑定到了一个节点上,Pod 中所有的容器都已被创建。至少有一个容器正在运行,或者正处于启动或重启状态;
- 成功(Succeeded):Pod 中的所有容器都被成功终止,并且不会再重启;
- 失败(Failed):Pod 中的所有容器都已终止了,并且至少有一个容器是因为失败终止。也就是说,容器以非
0状态退出或者被系统终止; - 未知(Unknown):因为某些原因无法取得 Pod 的状态,通常是因为与 Pod 所在主机通信失败导致的。
注意,Succeeded和Failed都是一种Terminated状态,即要么正常终止,要么因失败终止。
除此之外,PodStatus 对象中还有一个Conditions字段,是一个PodCondition结构的数组,该结构源码如下:
// PodCondition contains details for the current condition of this pod.
type PodCondition struct {
	// Type is the type of the condition.
	// Currently only Ready.
	// More info: https://kubernetes.io/docs/concepts/workloads/pods/pod-lifecycle#pod-conditions
	Type PodConditionType `json:"type" protobuf:"bytes,1,opt,name=type,casttype=PodConditionType"`
	// Status is the status of the condition.
	// Can be True, False, Unknown.
	// More info: https://kubernetes.io/docs/concepts/workloads/pods/pod-lifecycle#pod-conditions
	Status ConditionStatus `json:"status" protobuf:"bytes,2,opt,name=status,casttype=ConditionStatus"`
	// Last time we probed the condition.
	// +optional
	LastProbeTime metav1.Time `json:"lastProbeTime,omitempty" protobuf:"bytes,3,opt,name=lastProbeTime"`
	// Last time the condition transitioned from one status to another.
	// +optional
	LastTransitionTime metav1.Time `json:"lastTransitionTime,omitempty" protobuf:"bytes,4,opt,name=lastTransitionTime"`
	// Unique, one-word, CamelCase reason for the condition's last transition.
	// +optional
	Reason string `json:"reason,omitempty" protobuf:"bytes,5,opt,name=reason"`
	// Human-readable message indicating details about last transition.
	// +optional
	Message string `json:"message,omitempty" protobuf:"bytes,6,opt,name=message"`
}当然,也可以痛过命令kubectl explain pod.status.conditions来查看介绍,得到的内容和源码中的注释一致。里面的属性翻译一下就是:
- lastProbeTime:最后一次探测 Pod Condition 的时间戳。
- lastTransitionTime:上次 Condition 从一种状态转换到另一种状态的时间。
- message:上次 Condition 状态转换的详细描述。
- reason:Condition 最后一次转换的原因。
- status:Condition 状态类型,可以为 “True”, “False”, and “Unknown”.
- type:Condition 类型,包括以下方面:
- PodScheduled(Pod 已经被调度到其他 node 里)
- Ready(Pod 能够提供服务请求,可以被添加到所有可匹配服务的负载平衡池中)
- Initialized(所有的
init containers已经启动成功) - Unschedulable(调度程序现在无法调度 Pod,例如由于缺乏资源或其他限制)
- ContainersReady(Pod 里的所有容器都是 ready 状态
重启策略
除了Pod的状态之外,我们还需知道Pod的具体信息,比如它拥有的Volume、拥有的Container、希望被调度的node、各种策略等等,这些信息非常重要,存储在PodSpec结构之中,其源码如下:
// PodSpec is a description of a pod.
type PodSpec struct {
	// List of volumes that can be mounted by containers belonging to the pod.
    // ...
	// More info: https://kubernetes.io/docs/concepts/storage/volumes
	Volumes []Volume `json:"volumes,omitempty" patchStrategy:"merge,retainKeys" patchMergeKey:"name" protobuf:"bytes,1,rep,name=volumes"`
	// List of initialization containers belonging to the pod.
    // ...
	// More info: https://kubernetes.io/docs/concepts/workloads/pods/init-containers/
	InitContainers []Container `json:"initContainers,omitempty" patchStrategy:"merge" patchMergeKey:"name" protobuf:"bytes,20,rep,name=initContainers"`
	// List of containers belonging to the pod.
    // ...
	Containers []Container `json:"containers" patchStrategy:"merge" patchMergeKey:"name" protobuf:"bytes,2,rep,name=containers"`
	// Restart policy for all containers within the pod.
    // ...
	// More info: https://kubernetes.io/docs/concepts/workloads/pods/pod-lifecycle/#restart-policy
	RestartPolicy RestartPolicy `json:"restartPolicy,omitempty" protobuf:"bytes,3,opt,name=restartPolicy,casttype=RestartPolicy"`
	// Optional duration in seconds the pod needs to terminate gracefully. May be decreased in delete request.
	// ...
	TerminationGracePeriodSeconds *int64 `json:"terminationGracePeriodSeconds,omitempty" protobuf:"varint,4,opt,name=terminationGracePeriodSeconds"`
	// Optional duration in seconds the pod may be active on the node relative to
	// ...
	ActiveDeadlineSeconds *int64 `json:"activeDeadlineSeconds,omitempty" protobuf:"varint,5,opt,name=activeDeadlineSeconds"`
	// Set DNS policy for the pod. Defaults to "ClusterFirst".
	// ...
	DNSPolicy DNSPolicy `json:"dnsPolicy,omitempty" protobuf:"bytes,6,opt,name=dnsPolicy,casttype=DNSPolicy"`
	// NodeSelector is a selector which must be true for the pod to fit on a node.
    // ...
	// More info: https://kubernetes.io/docs/concepts/configuration/assign-pod-node/
	NodeSelector map[string]string `json:"nodeSelector,omitempty" protobuf:"bytes,7,rep,name=nodeSelector"`
	// ServiceAccountName is the name of the ServiceAccount to use to run this pod.
	// More info: https://kubernetes.io/docs/tasks/configure-pod-container/configure-service-account/
	ServiceAccountName string `json:"serviceAccountName,omitempty" protobuf:"bytes,8,opt,name=serviceAccountName"`
	// DeprecatedServiceAccount is a depreciated alias for ServiceAccountName.
	// ...
	DeprecatedServiceAccount string `json:"serviceAccount,omitempty" protobuf:"bytes,9,opt,name=serviceAccount"`
	// AutomountServiceAccountToken indicates whether a service account token should be automatically mounted.
	AutomountServiceAccountToken *bool `json:"automountServiceAccountToken,omitempty" protobuf:"varint,21,opt,name=automountServiceAccountToken"`
	// NodeName is a request to schedule this pod onto a specific node. If it is non-empty,
	// ...
	NodeName string `json:"nodeName,omitempty" protobuf:"bytes,10,opt,name=nodeName"`
	// Host networking requested for this pod. Use the host's network namespace.
	// ...
	HostNetwork bool `json:"hostNetwork,omitempty" protobuf:"varint,11,opt,name=hostNetwork"`
	// Use the host's pid namespace.
	// ...
	HostPID bool `json:"hostPID,omitempty" protobuf:"varint,12,opt,name=hostPID"`
	// Use the host's ipc namespace.
	// ...
	HostIPC bool `json:"hostIPC,omitempty" protobuf:"varint,13,opt,name=hostIPC"`
	// SecurityContext holds pod-level security attributes and common container settings.
	// ...
	SecurityContext *PodSecurityContext `json:"securityContext,omitempty" protobuf:"bytes,14,opt,name=securityContext"`
	// ImagePullSecrets is an optional list of references to secrets in the same namespace to use for pulling any of the images used by this PodSpec.
	// ...
	// More info: https://kubernetes.io/docs/concepts/containers/images#specifying-imagepullsecrets-on-a-pod
	ImagePullSecrets []LocalObjectReference `json:"imagePullSecrets,omitempty" patchStrategy:"merge" patchMergeKey:"name" protobuf:"bytes,15,rep,name=imagePullSecrets"`
	// Specifies the hostname of the Pod
	// ...
	Hostname string `json:"hostname,omitempty" protobuf:"bytes,16,opt,name=hostname"`
	// If specified, the fully qualified Pod hostname will be "<hostname>.<subdomain>.<pod namespace>.svc.<cluster domain>".
	// If not specified, the pod will not have a domainname at all.
	Subdomain string `json:"subdomain,omitempty" protobuf:"bytes,17,opt,name=subdomain"`
	// If specified, the pod's scheduling constraints
	Affinity *Affinity `json:"affinity,omitempty" protobuf:"bytes,18,opt,name=affinity"`
	// If specified, the pod will be dispatched by specified scheduler.
	// If not specified, the pod will be dispatched by default scheduler.
	SchedulerName string `json:"schedulerName,omitempty" protobuf:"bytes,19,opt,name=schedulerName"`
	// If specified, the pod's tolerations.
	Tolerations []Toleration `json:"tolerations,omitempty" protobuf:"bytes,22,opt,name=tolerations"`
	// HostAliases is an optional list of hosts and IPs that will be injected into the pod's hosts
	// file if specified. This is only valid for non-hostNetwork pods.
	// ...
	HostAliases []HostAlias `json:"hostAliases,omitempty" patchStrategy:"merge" patchMergeKey:"ip" protobuf:"bytes,23,rep,name=hostAliases"`
	// If specified, indicates the pod's priority. "SYSTEM" is a special keyword
	// which indicates the highest priority. Any other name must be defined by
	// creating a PriorityClass object with that name.
	// If not specified, the pod priority will be default or zero if there is no
	// default.
	// +optional
	PriorityClassName string `json:"priorityClassName,omitempty" protobuf:"bytes,24,opt,name=priorityClassName"`
	// The priority value. Various system components use this field to find the
	// priority of the pod. When Priority Admission Controller is enabled, it
	// prevents users from setting this field. The admission controller populates
	// this field from PriorityClassName.
	// The higher the value, the higher the priority.
	// +optional
	Priority *int32 `json:"priority,omitempty" protobuf:"bytes,25,opt,name=priority"`
	// Specifies the DNS parameters of a pod.
	// Parameters specified here will be merged to the generated DNS
	// configuration based on DNSPolicy.
	// This is an alpha feature introduced in v1.9 and CustomPodDNS feature gate must be enabled to use it.
	// +optional
	DNSConfig *PodDNSConfig `json:"dnsConfig,omitempty" protobuf:"bytes,26,opt,name=dnsConfig"`
} 注释太多了,这里删了很多,留了概要,如果想看详细介绍,用命令kubectl explain pod.spec 来查看即可。这里只谈和重启策略有关的字段,即restartPolicy。通过该字段可以来设置Pod中所有容器的重启策略,其值可能为Always、OnFailure、Never,默认值为Always。
// RestartPolicy describes how the container should be restarted.
// Only one of the following restart policies may be specified.
// If none of the following policies is specified, the default one
// is RestartPolicyAlways.
type RestartPolicy string

const (
	RestartPolicyAlways    RestartPolicy = "Always"
	RestartPolicyOnFailure RestartPolicy = "OnFailure"
	RestartPolicyNever     RestartPolicy = "Never"
)
restartPolicy 仅指通过kubelet在同一节点上重新启动Container。通过kubelet重新启动的退出容器每次重启都会有时间延迟,该延迟以指数级增加,上限为5分钟。如果容器重启后成功运行了10分钟,那么延迟重置。
不同类型的控制器有不同的Pod restartPolicy:
Job:适用于一次性任务如批量计算,任务结束后 Pod 会被此类控制器清除。Job 的重启策略只能是"OnFailure"或者"Never"。Replication Controller,ReplicaSet, orDeployment:此类控制器希望 Pod 一直运行下去,它们的重启策略只能是"Always"。DaemonSet:每个节点上启动一个 Pod,很明显此类控制器的重启策略也应该是"Always"。
Init Container
了解了 Pod 状态后,首先来了解下 Pod 中的 Init Container,也就是我们平时常说的初始化容器。Init Container就是用来做初始化工作的容器,可以是一个或者多个,所以PodSec中InitContainers是一个Container切片。如果有多个的话,这些容器会按定义的顺序依次执行。我们知道一个 Pod 里面的所有容器是共享Volume和Network namespace 的,所以Init Container里面产生的数据可以被主容器使用到。
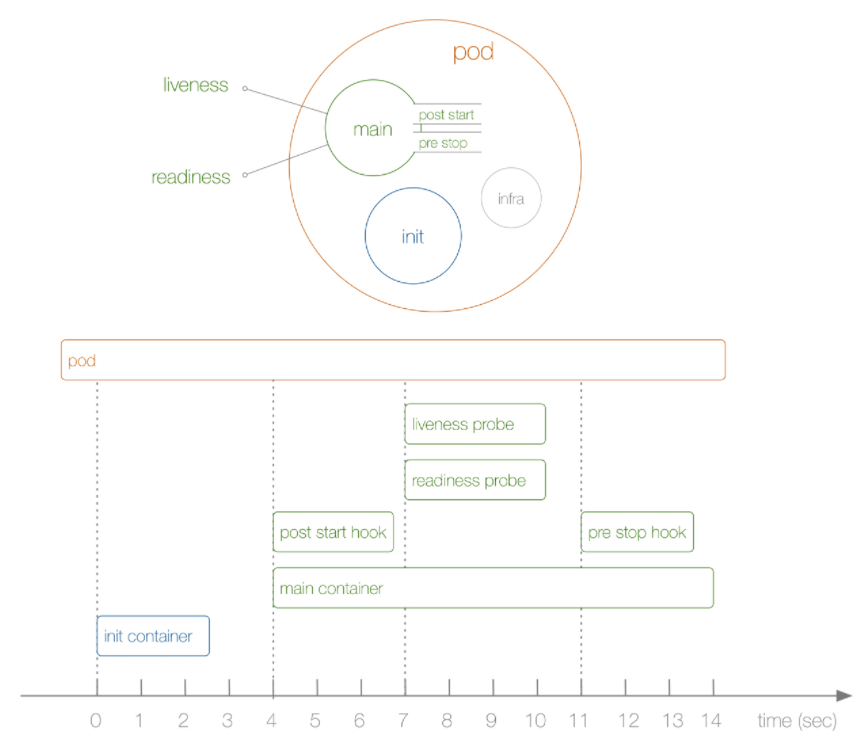
从上图可以看到,Init Container(s) 和 Infra 都不属于 main Container(s) 的,三者相互独立。实际上,启动玩Infra后,就开始启动初始化容器,只有所有的初始化容器执行完之后,主容器才会被启动。也就是说,在运行我们真正想要的Container之前,可以通过Init Container来预先做一些事。比如:
- 等待其他模块 Ready:这个可以用来解决服务之间的依赖问题,比如我们有一个 Web 服务的Pod,该服务又依赖于另外一个Mysql服务的Pod,但是在我们启动这个 Web 服务的时候我们并不能保证依赖的这个Mysql服务就已经启动起来了,所以可能会出现一段时间内 Web 服务连接数据库异常。要解决这个问题的话我们就可以在 Web 服务的 Pod 中使用一个
InitContainer,在这个初始化容器中去检查Mysql服务是否已经准备好了,准备好了过后初始化容器就结束退出,然后我们主容器的 Web 服务才被启动起来,这个时候去连接数据库就不会有问题了。 - 做初始化配置:比如集群里检测所有已经存在的成员节点,为主容器准备好集群的配置信息,这样主容器起来后就能用这个配置信息加入集群。
- 其它场景:如将 Pod 注册到一个中央数据库、配置中心等。
做个小实验,在 nginx Pod中使用Init Container,去初始化nginx的index页面,即下载一个html文件:
# init_test.yaml
apiVersion: v1
kind: Pod
metadata:
  name: init-demo
spec:
  volumes:
  - name: workdir
    emptyDir: {}
  initContainers:
  - name: install
    image: busybox
    command:
    - wget
    - "-O"
    - "/work-dir/index.html"
    - http://www.baidu.com
    volumeMounts:
    - name: workdir
      mountPath: "/work-dir"
  containers:
  - name: nginx
    image: nginx
    ports:
    - containerPort: 80
    volumeMounts:
    - name: workdir
mountPath: /usr/share/nginx/html在上面的资源清单中,首先在Pod顶层声明了一个名为workdir的Volume,且其类型为emptyDir,不同于之前用过的hostPath,emptyDir是一个临时目录,数据会保存在kubelet的工作目录下,且生命周期等同于Pod的声明周期。
接着,定义了一个初始化容器,该容器会下载一个html文件到/work-dir目录下面,但是由于我们将该目录挂载到了全局的 Volume,所以宿主机相应目录也会同步。同样,主容器 nginx 也将目录 /usr/share/nginx/html 声明挂载到了全局的 Volume,所以在主容器的该目录下面也会同步初始化容器中创建的 index.html 文件。
直接创建上面的 Pod:
$ kubectl apply -f init_test.yaml运行完之后立刻用describe查看Pod详细状态,这截取一部分
[root@master k8s]$ kubectl describe pod init-demo
Name:         init-demo
Namespace:    default
Priority:     0
Node:         node1/192.168.186.150
Start Time:   Mon, 07 Mar 2022 16:57:25 +0800
Labels:       <none>
Annotations:  kubectl.kubernetes.io/last-applied-configuration:
                {"apiVersion":"v1","kind":"Pod","metadata":{"annotations":{},"name":"init-demo","namespace":"default"},"spec":{"containers":[{"image":"ngi...
Status:       Pending
IP:
IPs:          <none>
Init Containers:
  install:
    Container ID:
    Image:         busybox
    Image ID:
    Port:          <none>
    Host Port:     <none>
    Command:
      wget
      -O
      /work-dir/index.html
      http://www.baidu.com
    State:          Waiting
      Reason:       PodInitializing

....

Containers:
  nginx:
    Container ID:
    Image:          nginx
    Image ID:
    Port:           80/TCP
    Host Port:      0/TCP
    State:          Waiting
      Reason:       PodInitializing
	Ready:          False
....

Conditions:
  Type              Status
  Initialized       False
  Ready             False
  ContainersReady   False
  PodScheduled      True

....

Events:
  Type    Reason     Age        From               Message
  ----    ------     ----       ----               -------
  Normal  Scheduled  <unknown>  default-scheduler  Successfully assigned default/init-demo to node1
Normal Pulling 3s kubelet, node1 Pulling image "busybox"可以看到,此时Pod的状态还是Pending,并不是Running,先看Events,发现此时初始化容器的镜像真正拉取,即容器还未见建立。所以在Init Containers中可以看到该初始化容器的State为Waiting。因为初始化容器未完成,所以Conditions.Initialized也为false。最关键的,Containers(main Container)中的所有容器(虽然这里只有一个)都会是Waiting状态,还未建立,自然也没有容器ID等信息。
过段时间再次查看Pod状态,此时所有的主容器都成功运行,状态为Running,而初始化容器变为了Completed。还可以从其中看到初始化容器执行的命令,main Container的ID等等。
[root@master k8s]$ kubectl describe pod init-demo
Name:         init-demo
Namespace:    default
Priority:     0
Node:         node1/192.168.186.150
Start Time:   Mon, 07 Mar 2022 16:57:25 +0800
Labels:       <none>
Annotations:  kubectl.kubernetes.io/last-applied-configuration:
                {"apiVersion":"v1","kind":"Pod","metadata":{"annotations":{},"name":"init-demo","namespace":"default"},"spec":{"containers":[{"image":"ngi...
Status:       Running
IP:           10.244.2.3
IPs:
  IP:  10.244.2.3
Init Containers:
  install:
    Container ID:  docker://72e3d8995cad94fc718ec7f2067ff5840a47c53b98bbe28bbd6ea34bc11d1aad
    Image:         busybox
    Image ID:      docker-pullable://busybox@sha256:5acba83a746c7608ed544dc1533b87c737a0b0fb730301639a0179f9344b1678
    Port:          <none>
    Host Port:     <none>
    Command:
      wget
      -O
      /work-dir/index.html
      http://www.baidu.com
    State:          Terminated
      Reason:       Completed
      Exit Code:    0
      Started:      Mon, 07 Mar 2022 16:57:44 +0800
      Finished:     Mon, 07 Mar 2022 16:57:44 +0800
    Ready:          True

...

Containers:
  nginx:
    Container ID:   docker://5e7dc96a79128ac5941e38e6163bfe3696d046f07d3bec28fe24c6a184f65e08
    Image:          nginx
    Image ID:       docker-pullable://nginx@sha256:0d17b565c37bcbd895e9d92315a05c1c3c9a29f762b011a10c54a66cd53c9b31
    Port:           80/TCP
    Host Port:      0/TCP
    State:          Running
      Started:      Mon, 07 Mar 2022 16:57:46 +0800
    Ready:          True

...

Conditions:
  Type              Status
  Initialized       True
  Ready             True
  ContainersReady   True
  PodScheduled      True

...

Events:
  Type    Reason     Age        From               Message
  ----    ------     ----       ----               -------
  Normal  Scheduled  <unknown>  default-scheduler  Successfully assigned default/init-demo to node1
  Normal  Pulling    7m16s      kubelet, node1     Pulling image "busybox"
  Normal  Pulled     6m58s      kubelet, node1     Successfully pulled image "busybox"
  Normal  Created    6m58s      kubelet, node1     Created container install
  Normal  Started    6m57s      kubelet, node1     Started container install
  Normal  Pulling    6m56s      kubelet, node1     Pulling image "nginx"
  Normal  Pulled     6m55s      kubelet, node1     Successfully pulled image "nginx"
  Normal  Created    6m55s      kubelet, node1     Created container nginx
  Normal  Started    6m55s      kubelet, node1     Started container nginx
通过Events可以看出,当Pod被分配给node之后,会首先建立Init Container,完成后才是主容器们。当然,最先建立的应该是Infra,即Pause,它要比Init Container建立的更早,因为要为Pod建立namespace等,不过对用户是透明的。
Pod建立完后,就可以试着去访问那个html了:
[root@master k8s]$ kubectl get pods -o wide
NAME        READY   STATUS    RESTARTS   AGE   IP           NODE    NOMINATED NODE   READINESS GATES
init-demo   1/1     Running   0          16m   10.244.2.3   node1   <none>           <none>
[root@master k8s]$ curl 10.244.2.3
<!DOCTYPE html>
<!--STATUS OK--><html> <head><meta http-equiv=content-type content=text/html;charset=utf-8><meta http-equiv=X-UA-Compatible content=IE=Edge><meta content=always name=referrer><link rel=stylesheet type=text/css href=http://s1.bdstatic.com/r/www/cache/bdorz/baidu.min.css><title>百度一下,你就知道</title></head> <body link=#0000cc>
....
Pod Hook
我们知道 Pod 是 Kubernetes 集群中的最小单元,而 Pod 是由容器组成的,所以在讨论 Pod 的生命周期的时候我们可以先来讨论下容器的生命周期。实际上 Kubernetes 为我们的容器提供了生命周期的钩子,就是我们说的Pod Hook。它虽然叫Pod Hook,但却是对容器的Hook。
Pod Hook 是由 kubelet 发起的,当容器中的进程启动前或者容器中的进程终止之前运行,这是包含在容器的生命周期之中。我们可以同时为 Pod 中的所有容器都配置 hook。
k8s有两种钩子:
PostStart:这个钩子在容器创建后立即执行。但是,并不能保证钩子将在容器 ENTRYPOINT 之前运行,因为没有参数传递给处理程序。主要用于资源部署、环境准备等。PreStop:这个钩子在容器终止之前立即被调用。它是阻塞的,意味着它是同步的,所以它必须在删除容器的调用发出之前完成。主要用于优雅关闭应用程序、通知其他系统等。如果钩子在执行期间挂起,Pod 阶段将一直停留在 running 。
这两个结构可以在源码中找到,位于podSpec.Container.Lifecycle中:
// A single application container that you want to run within a pod.
type Container struct {
    ...
    Lifecycle *Lifecycle `json:"lifecycle,omitempty" protobuf:"bytes,12,opt,name=lifecycle"`
    ...
}

// Lifecycle describes actions that the management system should take in response to container lifecycle
// events. For the PostStart and PreStop lifecycle handlers, management of the container blocks
// until the action is complete, unless the container process fails, in which case the handler is aborted.
type Lifecycle struct {
	PostStart *Handler `json:"postStart,omitempty" protobuf:"bytes,1,opt,name=postStart"`
	// PreStop is called immediately before a container is terminated.
	PreStop *Handler `json:"preStop,omitempty" protobuf:"bytes,2,opt,name=preStop"`
}
如果 PostStart 或者 PreStop 钩子失败, 它会杀死容器。所以我们应该让钩子函数尽可能的轻量。当然有些情况下,长时间运行命令是合理的, 比如在停止容器之前预先保存状态。
有两种方式实现上面的钩子:
Exec- 用于执行一段特定的命令,不过要注意的是该命令消耗的资源会被计入容器。HTTP- 对容器上的特定的端点执行 HTTP 请求。
举个例子,这里定义一个nginx Pod,并设置一个简单的前置钩子,写入一句话到 /usr/share/message 文件中,资源清单如下:
apiVersion: v1
kind: Pod
metadata:
  name: hook-demo1
spec:
  containers:
  - name: hook-demo1
    image: nginx
    lifecycle:
      postStart:
        exec:
          command: ["/bin/sh", "-c", "echo Hello from the postStart handler > /usr/share/message"]
创建上述Pod:
[root@master k8s]$ kubectl apply -f poststart_test.yaml
pod/poststart-demo created
[root@master k8s]$ kubectl get pods poststart-demo
NAME             READY   STATUS    RESTARTS   AGE
poststart-demo   1/1     Running   0          35s
创建成功后可以查看容器中 /usr/share/message 文件是否内容正确,由于这个Pod就一个容器,所以下面两个命令是等价的:
[root@master k8s]$ kubectl exec -it poststart-demo cat /usr/share/message
Hello from the postStart handler
[root@master k8s]$ kubectl exec -it poststart-demo -c poststart-demo1 cat /usr/share/message
Hello from the postStart handler实验完postStart后,再来看看preStop,顾名思义,就是再容器结束前触发的钩子。当用户请求删除含有Pod的资源对象时(如Pod本身、Deployment等),k为了让容器优雅的关闭(进程正常结束当前工作,再关容器),k8s可以通过preStop在容器关闭前结束进程。
比如,这里仍然创建nginx Pod,并在容器中声明一个preStop,功能仅为打印信息。Volume使信息同步到主机中。
apiVersion: v1
kind: Pod
metadata:
  name: prestop-demo
spec:
  volumes:
  - name: message
    hostPath:
      path: /home/sakura/k8s/tmp
  containers:
  - name: prestop-demo1
    image: nginx
    volumeMounts:
    - name: message
      mountPath: /usr/share/
    lifecycle:
      preStop:
        exec:
          command: ["/bin/sh", "-c","echo Hello from the preStop Handler > /usr/share/message"]
运行上述Pod,并查看其被分配到了哪个节点:
[root@master k8s]$ kubectl apply -f prestop_test.yaml
pod/prestop-demo created
[root@master k8s]$ kubectl describe pod prestop | grep assign
  Normal  Scheduled  <unknown>  default-scheduler  Successfully assigned default/prestop-demo to node1
可以看到,Pod被分配给了node1节点。然后,删除该Pod,在node1上查看该钩子是否被触发:
[root@master k8s]$ kubectl delete pod prestop-demo
pod "prestop-demo" deleted
[root@node1 tmp]$ ls
message
[root@node1 tmp]$ cat message
Hello from the preStop Handler
最后,Hook 调用的日志没有暴露个给 Pod,所以只能通过 describe 命令来获取。如果postStart或 preStop失败阻塞,可以在Event中看到FailedPostStartHook 或 FailedPreStopHook的信息。
Pod健康检查
接下来看看Pod健康检查部分。顾名思义,健康检查就是定时检查一下Pod是否健康,严格来讲是检查Pod中Container是否健康。容器怎么才算健康,k8s认为,一是正在运行,二是已就绪可以通信。这两种健康状态分别用liveness probe和readindess probe来检查。probe是探针的意思,很形象了,定期去探测,像探针一样。
- kubelet 通过使用
liveness probe来确定容器是否正在运行,通俗点将就是是否还活着。一般来说,如果容器崩溃了, Kubernetes 就会立刻知道它已经终止了,然后就会重启这个程序。而我们的 liveness probe 的目的就是来捕获到当前应用程序还没有终止,还没有崩溃,如果出现了这些情况,那么就重启处于该状态下的容器,使应用程序在存在 bug 的情况下依然能够继续运行下去。 - kubelet 使用
readiness probe来确定容器是否已经就绪可以接收流量过来了。这个探针通俗点讲就是说是否准备好了,现在可以开始工作了。只有当 Pod 中的容器都处于就绪状态的时候 kubelet 才会认定该 Pod 处于就绪状态,因为一个 Pod 下面可能会有多个容器。当然 Pod 如果处于非就绪状态,那么我们就会将他从 Service 的 Endpoints 列表中移除出来,这样我们的流量就不会被路由到这个 Pod 里面来了。
这两个探针也是可以在源码中找到的,位于Container结构中:
// A single application container that you want to run within a pod.
type Container struct {
    // Periodic probe of container liveness.
	// Container will be restarted if the probe fails.
    LivenessProbe *Probe `json:"livenessProbe,omitempty" protobuf:"bytes,10,opt,name=livenessProbe"`
    // Periodic probe of container service readiness.
	// Container will be removed from service endpoints if the probe fails.
    ReadinessProbe *Probe `json:"readinessProbe,omitempty" protobuf:"bytes,11,opt,name=readinessProbe"`
}
资源清单中,探针支持三种配置方式:
- exec:执行一段命令
- http:检测某个 http 请求
- tcpSocket:使用此配置,kubelet 将尝试在指定端口上打开容器的套接字。如果可以建立连接,容器被认为是健康的,如果不能就认为是失败的。实际上就是检查端口。
这里只说第一个,exec。
先说说liveness probe,如果用exec的话,它其实一条周期性执行的命令。如果该命令执行成功,说明容器还活着,不然的话,就会认为容器已经宕机了,然后重启容器,怎么重启,就是前面说的重启策略了。
实验一下,编写一个Pod,就一个容器。容器里声明一个liveness probe,这个probe会每5秒打印容器内的一个文件,仅此而已。但是这个容器会做一件事,那就是在启动之初创建上面那个文件,然后在30秒后把它给删了。资源清单如下:
apiVersion: v1
kind: Pod
metadata:
  name: liveness-exec
spec:
  containers:
  - name: liveness
    image: busybox
    args:
    - /bin/sh
    - -c
    - touch /tmp/healthy; sleep 30; rm -rf /tmp/healthy; sleep 600
    livenessProbe:
      exec:
        command:
        - cat
        - /tmp/healthy
      initialDelaySeconds: 5
      periodSeconds: 5
可以看到,在容器启动时,它会执行命令:
$ /bin/sh -c "touch /tmp/healthy; sleep 30; rm -rf /tmp/healthy; sleep 600"在容器内,声明了一个livenessProbe,其中的exec不用说,而后面两个参数分别代表第一次延时和执行间隔,具体为:
initialDelaySeconds:表示在第一次执行探针的时候要等待5秒,这样能够确保我们的容器能够有足够的时间启动起来。想象一下,如果没有这个初始延时,容器启动完成之前探针就执行了,那么它肯定会失败的。这样的话,kubelet 就认为该容器需要重启,从而无限制的重启容器。periodSeconds:表示让 kubelet 每隔5秒执行一次探针,也就是每5秒执行一次上面的cat /tmp/healthy命令,如果命令执行成功了,将返回0,那么 kubelet 就会认为当前这个容器是存活的,如果返回的是非0值,那么 kubelet 就会把该容器杀掉然后重启它。默认是10秒,最小1秒。
直接运行该Pod,并在30s内查看Events,发现没有什么信息,容器正常启动
[root@master k8s]$ kubectl apply -f liveness-exec.yaml
pod/liveness-exec created
[root@master k8s]$ kubectl describe pod liveness-exec
...
Events:
  Type    Reason     Age        From               Message
  ----    ------     ----       ----               -------
  Normal  Scheduled  <unknown>  default-scheduler  Successfully assigned default/liveness-exec to node2
  Normal  Pulling    20s        kubelet, node2     Pulling image "busybox"
  Normal  Pulled     4s         kubelet, node2     Successfully pulled image "busybox"
  Normal  Created    4s         kubelet, node2     Created container liveness
Normal Started 4s kubelet, node2 Started container liveness等一会后(大于30s),容器已经把/tmp/healthy删了,所以探针命令不会执行成功了,这时候再看一下Events:
[root@master k8s]$ kubectl describe pod liveness-exec
...
Events:
  Type     Reason     Age                  From               Message
  ----     ------     ----                 ----               -------
  Normal   Scheduled  <unknown>            default-scheduler  Successfully assigned default/liveness-exec to node2
  Normal   Pulling    71s (x2 over 2m38s)  kubelet, node2     Pulling image "busybox"
  Normal   Pulled     55s (x2 over 2m22s)  kubelet, node2     Successfully pulled image "busybox"
  Normal   Created    55s (x2 over 2m22s)  kubelet, node2     Created container liveness
  Normal   Started    55s (x2 over 2m22s)  kubelet, node2     Started container liveness
  Warning  Unhealthy  11s (x6 over 111s)   kubelet, node2     Liveness probe failed: cat: can't open '/tmp/healthy': No such file or directory
Normal Killing 11s (x2 over 101s) kubelet, node2 Container liveness failed liveness probe, will be restarted可以看到,liveness probe执行失败后,Pod变成了unhealthy,从描述中可以看到是因为这个探针运行失败了。紧接着,kubelet开始重启这个Container,所以会把原来那个kill掉,重启。用这个探针的话,容器只能”存活“30s,然后就会被重启:
[root@master k8s]$ kubectl get pod liveness-exec
NAME            READY   STATUS    RESTARTS   AGE
liveness-exec   1/1     Running   4          7m24s
大约每隔30s,上述RESTARTS数就会加一。
readiness probe的配置跟liveness probe基本上一致的。唯一的不同是使用readinessProbe而不是livenessProbe。两者如果同时使用的话就可以确保流量不会到达还未准备好的容器,准备好过后,如果应用程序出现了错误,则会重新启动容器。这个以后再说。
另外除了上面的initialDelaySeconds和periodSeconds属性外,探针还可以配置如下几个参数:
- timeoutSeconds:探测超时时间,默认1秒,最小1秒。
- successThreshold:探测失败后,最少连续探测成功多少次才被认定为成功。默认是 1,但是如果是
liveness则必须是 1。最小值是 1。 - failureThreshold:探测成功后,最少连续探测失败多少次才被认定为失败。默认是 3,最小值是 1。
另外,initialDelaySeconds用来确保在容器启动后才执行探针,所以设置时间。但实际上,很多容器的启动时间是不确定的,比如拉镜像的时间很不稳定,如果设久了又不合适,那怎么办?
在 k8s v1.16 版本官方特地新增了一个 startupProbe(启动探针),该探针将推迟所有其他探针,直到 Pod 完成启动为止,使用方法和存活探针一样:
startupProbe:
  httpGet:
    path: /healthz
    port: 8080
  failureThreshold: 30  # 尽量设置大点
  periodSeconds: 10
上面这里的配置表示我们的慢速容器最多可以有5分钟(30个检查 * 10秒= 300s)来完成启动,期间不会有其他探针执行。
Pod运行资源
实际上上面几个步骤就是影响一个 Pod 生命周期的大的部分,但是还有一些细节也会在 Pod 的启动过程进行设置,比如在容器启动之前还会为当前的容器设置分配的 CPU、内存等资源,我们知道我们可以通过 CGroup 来对容器的资源进行限制,同样的,在 Pod 中我们也可以直接配置某个容器使用的 CPU 或者内存的上限。
现在的OS基本都是分时系统,即CPU是按时间片去分配的。所以,哪个任务申请的CPU时间片越多,那么它得到的CPU资源越多,好理解。
在CGroup中,CPU资源是有量化和单位的,以核来换算:
1 Core = 1000 m
0.5 Core = 500 m
m就是毫核的意思,k8s集群中的每一个节点都可以通过OS的命令来确定本节点的CPU内核数量,然后将这个数量乘以1000,就是node的总CPU资源数。在Pod中,可以通过配置requests和limits的配置来设置对资源的申请和限制。
spec.containers[].resources.requests.cpu:CPU请求值,Kubernetes 调度算法里的依据值,可以超过;spec.containers[].resources.limits.cpu:CPU 上限值,可以短暂超过,容器也不会被停止。
// A single application container that you want to run within a pod.
type Container struct {
    // Compute Resources required by this container.
    Resources ResourceRequirements `json:"resources,omitempty" protobuf:"bytes,8,opt,name=resources"`
}
// ResourceRequirements describes the compute resource requirements.
type ResourceRequirements struct {
// Limits describes the maximum amount of compute resources allowed.
Limits ResourceList `json:"limits,omitempty" protobuf:"bytes,1,rep,name=limits,casttype=ResourceList,castkey=ResourceName"`
// Requests describes the minimum amount of compute resources required.
// If Requests is omitted for a container, it defaults to Limits if that is explicitly specified,
// otherwise to an implementation-defined value.
Requests ResourceList `json:"requests,omitempty" protobuf:"bytes,2,rep,name=requests,casttype=ResourceList,castkey=ResourceName"`
}requests是用于集群调度使用的资源,而limits才是真正用于资源限制的配置。如果一个Pod中某个容器的requests.cpu大于任何node的CPU核数,那么这个Pod将无法调度,因为没有节点可以满足资源申请。
定义一个Pod,其中只有一个容器,配置如下:
apiVersion: v1
kind: Pod
metadata:
  name: resource-demo1
spec:
  containers:
  - name: resource-demo1
    image: nginx
    ports:
    - containerPort: 80
    resources:
      requests:
        memory: 50Mi
        cpu: 50m
      limits:
        memory: 100Mi
        cpu: 100m
这里,容器会申请CPU资源50m,也就是 0.05core,这 0.05 core 也就是占了 1 CPU 里的 5% 的资源时间。而限制资源是给的是 100m,但是需要注意的是 CPU 资源是可压缩资源,也就是容器达到了这个设定的上限后,容器性能会下降,但是不会终止或退出。同样,内存申请为50M,限制为100M。
这里注意的是
MiB ≠ MB,MB 是十进制单位,MiB 是二进制,平时我们以为 MB 等于 1024KB,其实1MB=1000KB,1MiB才等于1024KiB。中间带字母 i 的是国际电工协会(IEC)定的,走1024乘积;KB、MB、GB是国际单位制,走1000乘积。
创建这个Pod:
$ kubectl apply -f resource-test.yaml这个Pod被调度到了node2中,所以进去看看里面的容器:
[root@node2 k8s]$ docker ps | grep resource-demo
bd2bf6e8facf   nginx                                               "/docker-entrypoint.…"   3 minutes ago   Up 3 minutes             k8s_resource-demo1_resource-demo1_default_37db961b-249e-48a4-9f4d-5542de6b37e5_0
4444a3a0bdf0 registry.aliyuncs.com/google_containers/pause:3.1 "/pause" 3 minutes ago Up 3 minutes k8s_POD_resource-demo1_default_37db961b-249e-48a4-9f4d-5542de6b37e5_0其中,第一个就是我们的nginx容器,也就是主容器。第二个是pause容器,也就是Infra,每个Pod都会有一个它。之后就可以通过inspect看下这个容器的详细信息了,其中就包括资源占用相关:
[root@node2 k8s]$ docker inspect bd2bf6e8facf
...
 "CpuShares": 51,
 "Memory": 104857600,
 "NanoCpus": 0,
 "CgroupParent": "kubepods-burstable-pod37db961b_249e_48a4_9f4d_5542de6b37e5.slice",
 "BlkioWeight": 0,
 "BlkioWeightDevice": null,
 "BlkioDeviceReadBps": null,
 "BlkioDeviceWriteBps": null,
 "BlkioDeviceReadIOps": null,
 "BlkioDeviceWriteIOps": null,
 "CpuPeriod": 100000,
 "CpuQuota": 10000,
 "CpuRealtimePeriod": 0,
 "CpuRealtimeRuntime": 0,
 "CpusetCpus": "",
 "CpusetMems": "",
 "Devices": [],
 "DeviceCgroupRules": null,
 "DeviceRequests": null,
 "KernelMemory": 0,
 "KernelMemoryTCP": 0,
 "MemoryReservation": 0,
 "MemorySwap": 104857600,
 "MemorySwappiness": null,
 "OomKillDisable": false,
 "PidsLimit": null,
 "Ulimits": null,
 "CpuCount": 0,
 "CpuPercent": 0,
 "IOMaximumIOps": 0,
 "IOMaximumBandwidth": 0,
 ...
Pod 上的资源配置最终也还是通过底层的容器运行时去控制 CGroup 来实现的,而 CGroup 是通过文件系统来进行资源限制的。